Friday, September 17, 2010

How to edit records by selecting checkboxes?

Hi,

Create a VF page 
This page contains list of contacts.
By default these records are not editable.
Each record has a checkbox.
If user clicks on a checkbox, then corresponding record will become editable.
User can modify that reocrd
Like that user can select multiple records and can modify them.
After changes, save all only those records which are editable. 
After saving the records refresh page and display updated record.
All checkboxes now should become unchecked.

Read and Insert records from a CSV file - Using Visualforce

The Apex Data Loader is always there when you want to insert records into Salesforce from a CSV file. But, just in case if you don't want your users to install the Apex Data Loader and learn how to use it, then here is a simple example which tells you how to do the same using Visualforce.

Click here to view the demo.


Step 1:

Download the template from the DEMO URL above. Save the file in your desktop. Upload the file into Static Resources with the name "AccountUploadTemplate".

Step 2:

Create an Apex Class named "FileUploader". Paste the code below and save it.


public class FileUploader 
{
    public string nameFile{get;set;}
    public Blob contentFile{get;set;}
    String[] filelines = new String[]{};
    List<Account> accstoupload;
    
    public Pagereference ReadFile()
    {
        nameFile=contentFile.toString();
        filelines = nameFile.split('\n');
        accstoupload = new List<Account>();
        for (Integer i=1;i<filelines.size();i++)
        {
            String[] inputvalues = new String[]{};
            inputvalues = filelines[i].split(',');
            
            Account a = new Account();
            a.Name = inputvalues[0];
            a.ShippingStreet = inputvalues[1];       
            a.ShippingCity = inputvalues[2];
            a.ShippingState = inputvalues[3];
            a.ShippingPostalCode = inputvalues[4];
            a.ShippingCountry = inputvalues[5];

            accstoupload.add(a);
        }
        try{
        insert accstoupload;
        }
        catch (Exception e)
        {
            ApexPages.Message errormsg = new ApexPages.Message(ApexPages.severity.ERROR,'An error has occured. Please check the template or try again later');
            ApexPages.addMessage(errormsg);
        }    
        return null;
    }
    
    public List<Account> getuploadedAccounts()
    {
        if (accstoupload!= NULL)
            if (accstoupload.size() > 0)
                return accstoupload;
            else
                return null;                    
        else
            return null;
    }            
}

Step 3:

Create a Visualforce Page named "UploadAccounts". Paste the code below and save it.


<apex:page sidebar="false" controller="FileUploader">
   <apex:form >
      <apex:sectionHeader title="Upload data from CSV file"/>
      <apex:pagemessages />
      <apex:pageBlock >
             <center>
              <apex:inputFile value="{!contentFile}" filename="{!nameFile}" /> <apex:commandButton action="{!ReadFile}" value="Upload File" id="theButton" style="width:70px;"/>
              <br/> <br/> <font color="red"> <b>Note: Please use the standard template to upload Accounts. <a href="{!URLFOR($Resource.AccountUploadTemplate)}" target="_blank"> Click here </a> to download the template. </b> </font>
             </center>  
      
      
      <apex:pageblocktable value="{!uploadedAccounts}" var="acc" rendered="{!NOT(ISNULL(uploadedAccounts))}">
          <apex:column headerValue="Account Name">
              <apex:outputField value="{!acc.Name}"/>
          </apex:column>
          <apex:column headerValue="Shipping Street">
              <apex:outputField value="{!acc.ShippingStreet}"/>
          </apex:column>
          <apex:column headerValue="Shipping City">
              <apex:outputField value="{!acc.ShippingCity}"/>
          </apex:column>
          <apex:column headerValue="Shipping State">
              <apex:outputField value="{!acc.ShippingState}"/>
          </apex:column>
          <apex:column headerValue="Shipping Postal Code">
              <apex:outputField value="{!acc.ShippingPostalCode}"/>
          </apex:column>
          <apex:column headerValue="Shipping Country">
              <apex:outputField value="{!acc.ShippingCountry}"/>
          </apex:column>
      </apex:pageblocktable> 
      
      </apex:pageBlock>       
   </apex:form>   
</apex:page>


Screenshot:

Some pointers:
  • You can use only the standard template. Because, that's how we have done the mapping to the columns in excel and the fields in Salesforce. You can modify the mapping and use your own template.
  • Allowing the user to choose his own mapping is possible i believe, but may be a bit complex.
  • Also, we use a CSV file. So, you may have to use additional criteria if your data values itself have a comma in them (For ex: Billing Street = 'Mumbai, India ') . This would cause problems because Mumbai and India would be considered as seperate values because of the comma in between them.

Inline Google Maps using Visualforce

Sometime ago we’ve seen how to integrate Google Maps in a Salesforce.com page to pinpoint a specific address on the map, more precisely, how to add an inline map to pinpoint an Account Billing Address. I revisited the script I wrote more than a year ago and produced it as a Visualforce page, here’s the result.

The finished product

Here’s a screenshot of what we are going to get:
Inline Google Maps using Visualforce


Improvements

  • I’m now using Google Maps API v3, which makes the map faster to load and doesn’t require an API key anymore.
  • I removed the search term {!Account.BillingState}, so the script should now correctly map any address, not only US ones.
  • It degrades nicely if the Account Billing Address isn’t found, as shown below:

Setup

Follow the 3 steps below:
  1. In Salesforce.com, navigate to Setup > Customize > Develop > Pages and create a new Visualforce Page with the following code:


     <apex:page standardController="Account">
    
    <head>
    
    <script type="text/javascript" src="http://maps.google.com/maps/api/js?sensor=false"></script>
    <script type="text/javascript" src="http://ajax.googleapis.com/ajax/libs/jquery/1/jquery.min.js"></script> 
    <script type="text/javascript"> 
    
    $(document).ready(function() {
      
      var myOptions = {
        zoom: 15,
        mapTypeId: google.maps.MapTypeId.ROADMAP,
        mapTypeControl: false
      }
      
      var map;
      var marker;
      
      var geocoder = new google.maps.Geocoder();
      var address = "{!Account.BillingStreet}, " + "{!Account.BillingCity}, " + "{!Account.BillingPostalCode}, " + "{!Account.BillingCountry}";
      
      var infowindow = new google.maps.InfoWindow({
        content: "<b>{!Account.Name}</b><br>{!Account.BillingStreet}<br>{!Account.BillingCity}, {!Account.BillingPostalCode}<br>{!Account.BillingCountry}"
      });
    
      geocoder.geocode( { address: address}, function(results, status) {
        if (status == google.maps.GeocoderStatus.OK && results.length) {
          if (status != google.maps.GeocoderStatus.ZERO_RESULTS) {
          
            //create map
            map = new google.maps.Map(document.getElementById("map"), myOptions);
          
            //center map
            map.setCenter(results[0].geometry.location);
            
            //create marker
            marker = new google.maps.Marker({
                position: results[0].geometry.location,
                map: map,
                title: "{!Account.Name}"
            });
            
            //add listeners
            google.maps.event.addListener(marker, 'click', function() {
              infowindow.open(map,marker);
            });
            google.maps.event.addListener(infowindow, 'closeclick', function() {
              map.setCenter(marker.getPosition()); 
            });
            
          }
          
        } else {
          $('#map').css({'height' : '15px'});
          $('#map').html("Oops! {!Account.Name}'s billing address could not be found, please make sure the address is correct.");
          resizeIframe();
        }
      });
      
      function resizeIframe() {
        var me = window.name;
        if (me) {
          var iframes = parent.document.getElementsByName(me);
          if (iframes && iframes.length == 1) {
            height = document.body.offsetHeight;
            iframes[0].style.height = height + "px";
          }
        }
      }
      
    });
    </script>
    
    <style>
    #map {
      font-family: Arial;
      font-size:12px;
      line-height:normal !important;
      height:250px;
      background:transparent;
    }
    </style>
    
    </head>
     
    <body>
    <div id="map"></div> 
    </body> 
    </apex:page>
    

    Add the Visualforce page on the Account page layout (in a single-column section) and set it’s height to be 250px.
  2. All done! :) Navigate to one of your Account records and verify the map is displaying correctly!
Let me know if you have any questions/comments!

Passing parameters to a visualforce page and between pages

Many a times you would want to pass parameters to a visualforce page..

Well, there are two situations in which you would want this.. One is when you want to pass parameters on the click of a custom button.. Other is when you want to pass parameters from one visualforce page to another....

Situation 1
You will see that when you create a custom button and select the source as visualforce page you would see only the page selection and no other option... Well there is a work around for this..

Select the content source as URL and not visualforce... Then you can type the URL as \apex\yourpage.. And what more you can now pass as many parameters as you need using merge fields... There is one more advantage in this method.. You are not forced to use a standard controller with an extension just for your page to appear in the list when you actually do not need a standard controller..


Situation 2
When you want to pass parameters between visualforce pages use the <apex:param> tag....

Here is a small sample program

Step 1: First we create a Visualforce page called SamplePage1....

<apex:page >
<apex:outputlink value="/apex/SamplePage2"> Click Here <apex:param name="msg" value="success"/> </apex:outputlink>
</apex:page>


Step 2: Save this page and now click on " Click Here" link. You will see that when you click on the link you will navigate to a new page called SamplePage2. Check the URL now..


https://na5.salesforce.com/apex/SamplePage2?msg=success&msg2=Story...

You can see that the parameter " msg" with value "success" has been passed to the new page.


Now, how will you retrieve this value in your APEX CLASS for processing.... see below....


Step3: We will put the following code in our SamplePage2

<apex:page controller="Sampleclass"> </apex:page>


The Apex Class code would be


public class Sampleclass
{
Public String message = System.currentPagereference().getParameters().get('msg'); 
Public String message = System.currentPagereference().getParameters().get('msg2');  
}


So now, the variable "message" would store the value of your parameter "msg"....


TEST Method?????


public class Sampleclass
{
Public String message = System.currentPagereference().getParameters().get('msg');
public static testmethod void SampleclassTest()
{
System.currentPagereference().getParameters().put('msg','success');
}
}


And at last some suggestions...


Be careful with the values you pass in the URL.. Special Characters will cause problems
when passed in the URL.. For ex if you pass the Account Name "Shah & shah".. this would'nt
pass properly as the special character "&" cant get into the URL..


So as a best practice always pass ID's.. you can write a query and retrieve any other field
in the APEX Class


Wednesday, September 15, 2010

Checkbox in DataTable

Displaying the check box in a data table or page block table is a general requirement in every project. with the help of wrapper class we can display the checkboxes in a data table (Which Fetches the records automatically on check box selected). For the select all checkbox we need to add small javascript so that if we select the header checkbox it will select all the checkboxes.
Please watch the below figure for details.

Image:Checkbox_in_DataTable.PNG


Page Code as follows:

<apex:page controller="Checkbox_Class" Tabstyle="Account">
<apex:form>
 
<apex:pageBlock Title="Accounts with CheckBoxes">
<apex:pageBlockSection Title="List of Available Accounts">
<apex:dataTable value="{!accounts}" var="a" columnswidth="50px,50px" cellpadding="4" border="1">
<apex:column >
<apex:facet name="header"> <apex:inputCheckbox >
<apex:actionSupport event="onclick" action="{!GetSelected}" onsubmit="checkAll(this)" rerender="Selected_PBS"/>
</apex:inputCheckbox></apex:facet>
<apex:inputCheckbox value="{!a.selected}" id="checkedone">
<apex:actionSupport event="onclick" action="{!GetSelected}" rerender="Selected_PBS"/>
</apex:inputCheckbox></apex:column>
<apex:column headervalue="Account Name" value="{!a.acc.Name}" />
<apex:column headervalue="Account Number" value="{!a.acc.AccountNumber}" />
<apex:column headervalue="Phone" value="{!a.acc.Phone}" />
</apex:dataTable>
</apex:pageBlockSection>

<apex:pageBlockSection Title="Selected Accounts" id="Selected_PBS">
<apex:dataTable value="{!SelectedAccounts}" var="s" columnswidth="50px,50px" cellpadding="4" border="1">
<apex:column headervalue="Account Name" value="{!s.Name}" />
<apex:column headervalue="Account Number" value="{!s.AccountNumber}" />
<apex:column headervalue="Phone" value="{!s.Phone}" />
</apex:dataTable>
</apex:pageBlockSection>

</apex:pageBlock>
</apex:form>
<script>
function checkAll(cb)
{
var inputElem = document.getElementsByTagName("input");
for(var i=0; i<inputElem.length; i++)
{
if(inputElem[i].id.indexOf("checkedone")!=-1)
inputElem[i].checked = cb.checked;
}
}    
</script>
</apex:page> 

Controller Code is:

public class Checkbox_Class 
{ 
    List<accountwrapper> accountList = new List<accountwrapper>();
    List<Account> selectedAccounts = new List<Account>();
        
    public List<accountwrapper> getAccounts()
    {
        for(Account a : [select Id, Name, AccountNumber, Phone from Account limit 5])
        accountList.add(new accountwrapper(a));
        return accountList;
    }
    
    public PageReference getSelected()
    {
        selectedAccounts.clear();
        for(accountwrapper accwrapper : accountList)
        if(accwrapper.selected == true)
        selectedAccounts.add(accwrapper.acc);
        return null;
    }
    
    public List<Account> GetSelectedAccounts()
    {
        if(selectedAccounts.size()>0)
        return selectedAccounts;
        else
        return null;
    }    
    
    public class accountwrapper
    {
        public Account acc{get; set;}
        public Boolean selected {get; set;}
        public accountwrapper(Account a)
        {
            acc = a;
            selected = false;
        }
    }
} 

 Cheers!!!

Friday, September 3, 2010

Salesforce: Apex Trigger to Reassign Contacts and Open Opportunities

Standard Salesforce functionality allows for the reassignment of Contacts and open Opportunities when the Account to which these records are associated is reassigned to a new User. Clicking the "[change]" link next to the Account Owner field on the Account detail page will allow you to step through a process by which you select a new Account owner and save the changes. Once the changes are made the system will go out and reassign all Contacts and all open Opportunities owned by the old Account Owner to the new Account Owner. This is useful and so automatic that you may not even be aware that it happens.

So what if you work for an organization where Account reassignment tasks are handled in mass or they are handled by some Salesforce integration? Unless the admin performing the mass updates is explicitly updating the related records or there is code in the integration explicitly reassigning the records, the related Contacts and Opportunities are remaining assigned to the old Account Owner.
That's why I wrote the following trigger. It will perform the ownership update for related Contacts and Opportunities when the Owner of the associated Account is updated.

For some security might be a concern sending the data via URL parameters.
Up to this point, I have not been able to confirm if Google is officially supporting SSL connections to rectify this problem. However the following seems to be fine


trigger reassignRelatedContactsAndOpportunities on Account (after update) {
 try {
  Set accountIds = new Set(); //set for holding the Ids of all Accounts that have been assigned to new Owners
  Map oldOwnerIds = new Map(); //map for holding the old account ownerId
  Map newOwnerIds = new Map(); //map for holding the new account ownerId
  Contact[] contactUpdates = new Contact[0]; //Contact sObject to hold OwnerId updates
  Opportunity[] opportunityUpdates = new Opportunity[0]; //Opportunity sObject to hold OwnerId updates
  
  for (Account a : Trigger.new) { //for all records
   if (a.OwnerId != Trigger.oldMap.get(a.Id).OwnerId) {
    oldOwnerIds.put(a.Id, Trigger.oldMap.get(a.Id).OwnerId); //put the old OwnerId value in a map
    newOwnerIds.put(a.Id, a.OwnerId); //put the new OwnerId value in a map
    accountIds.add(a.Id); //add the Account Id to the set
   }
  }
  
  if (!accountIds.isEmpty()) { //if the accountIds Set is not empty
   for (Account act : [SELECT Id, (SELECT Id, OwnerId FROM Contacts), (SELECT Id, OwnerId FROM Opportunities WHERE IsClosed = False) FROM Account WHERE Id in :accountIds]) { //SOQL to get Contacts and Opportunities for updated Accounts
    String newOwnerId = newOwnerIds.get(act.Id); //get the new OwnerId value for the account
    String oldOwnerId = oldOwnerIds.get(act.Id); //get the old OwnerId value for the account
    for (Contact c : act.Contacts) { //for all contacts
     if (c.OwnerId == oldOwnerId) { //if the contact is assigned to the old account Owner
      Contact updatedContact = new Contact(Id = c.Id, OwnerId = newOwnerId); //create a new Contact sObject
      contactUpdates.add(updatedContact); //add the contact to our List of updates
     }
    }
    for (Opportunity o : act.Opportunities) { //for all opportunities
     if (o.OwnerId == oldOwnerId) { //if the opportunity is assigned to the old account Owner
      Opportunity updatedOpportunity = new Opportunity(Id = o.Id, OwnerId = newOwnerId); //create a new Opportunity sObject
      opportunityUpdates.add(updatedOpportunity); //add the opportunity to our List of updates
     }
    }
   }
   update contactUpdates; //update the Contacts
   update opportunityUpdates; //update the Opportunities
  }
 } catch(Exception e) { //catch errors
  System.Debug('reassignRelatedContactsAndOpportunities failure: '+e.getMessage()); //write error to the debug log
 }
} 

 
The code itself is fairly straightforward. If your Users/Admins elect to perform one-off Account ownership changes via the Salesforce GUI then the regular functionality still applies. This code simply keeps you covered when performing Account assignment changes in another manner.
-greg

Tuesday, August 31, 2010

create a Google Map S-Control


In many cases you may need to create a control that utilizes the Google Map APIs to show location of a client, client's offices, driving directions, etc to the user.

In this example, I will demonstrate how you can develop a s-control to show driving directions from the User's location to any Account that the User is viewing.

In order to accomplish this I initially thought of a Visualforce Page which hosts the Google Map API and I could use the all-ready standard components with original Salesforce look and feel.

So I tried and I tired and did not seem to get anywhere since Google was not recognizing my key, so Google's authentication for my website let's say: http://na5.salesforce.com/ would fail each time I tried to view my VF page. Finally I decided to do this in a S-Control and then call the S-Control in VF page.

If you need more information about how you can call a S-Control in your VF pages click here.

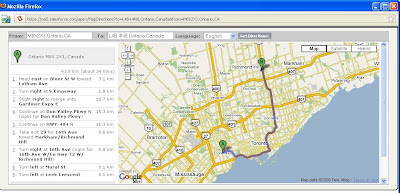
So first let's see what we want to achieve:
The S-Control reads the URL parameters and looks for two parameters to be passed to it:
  • from: the location where the sales rep (user) is located.
  • to: The target location, could be the Account's address
Once the S-Control is called and the two parameters passed via URL, the S-Control then in turn calls Google's APIs to view the map and show the directions information.

Now let's first create a new S-Control:
  1. Click on "Setup" which is located on the top right corner of the force.com page.
  2. Expand "Develop" item and click on "S-Controls"
  3. Hit "New Custom S-Control"
  4. Provide a Label "Map Directions" and a description is you wished to
  5. The Type should be HTML since we want to create a HTML, Google API mash up
  6. Now it is time to enter the code for the S-Control


<html xmlns="http://www.w3.org/1999/xhtml" xmlns:v="urn:schemas-microsoft-com:vml">
<head>
<meta http-equiv="content-type" content="text/html; charset=utf-8" />
<title>Google Maps JavaScript API Example: Advanced Directions</title>
<link href="/dCSS/Theme2/default/common.css" type="text/css" media="handheld,print,projection,screen,tty,tv"
rel="stylesheet">
<link href="/dCSS/Theme2/default/custom.css" type="text/css" media="handheld,print,projection,screen,tty,tv"
rel="stylesheet">

<script src=" http://maps.google.com/?file=api&amp;v=2.x&amp;key={YOUR KEY}"
type="text/javascript"></script>

<script src="/js/functions.js" type="text/javascript"></script>

<script type="text/javascript" src="/soap/ajax/13.0/connection.js"></script>

<style type="text/css">
body {
font-family: Verdana, Arial, sans serif;
font-size: 11px;
margin: 2px;
}
table.directions th {
background-color:#EEEEEE;
}

img {
color: #000000;
}
</style>

<script type="text/javascript">

var map;
var gdir;
var geocoder = null;
var addressMarker;
var dirFrom = '{!$Request.from}';
var dirTo = '{!$Request.to}';
var mapLocale = ""
var SControlID = '{!$Request.lid}';
var SFrameIC = '{!$Request.ic}';


function initValues()
{
mapLocale = "en_US";

setInputFields(dirFrom,dirTo);
}

function setInputFields(from, to)
{
window.document.getElementById("fromAddress").value = from;
window.document.getElementById("toAddress").value = to;
}


function initialize()
{
initValues();

if (GBrowserIsCompatible()) {
map = new GMap2(document.getElementById("map_canvas"));
map.addControl(new GSmallMapControl());
map.addControl(new GMapTypeControl());
gdir = new GDirections(map, document.getElementById("directions"));
GEvent.addListener(gdir, "load", onGDirectionsLoad);
GEvent.addListener(gdir, "error", handleErrors);

setDirections(dirFrom, dirTo, mapLocale);
}
}

function setDirections(fromAddress, toAddress, locale) {
if ((fromAddress) && (toAddress))
gdir.load("from: " + fromAddress + " to: " + toAddress,
{ "locale": locale });
}

function handleErrors()
{
if (gdir.getStatus().code == G_GEO_UNKNOWN_ADDRESS)
alert("No corresponding geographic location could be found for one of the specified addresses. This may be due to the fact that the address is relatively new, or it may be incorrect.\nError code: " + gdir.getStatus().code);
else if (gdir.getStatus().code == G_GEO_SERVER_ERROR)
alert("A geocoding or directions request could not be successfully processed, yet the exact reason for the failure is not known.\n Error code: " + gdir.getStatus().code);

else if (gdir.getStatus().code == G_GEO_MISSING_QUERY)
alert("The HTTP q parameter was either missing or had no value. For geocoder requests, this means that an empty address was specified as input. For directions requests, this means that no query was specified in the input.\n Error code: " + gdir.getStatus().code);

// else if (gdir.getStatus().code == G_UNAVAILABLE_ADDRESS) <--- Doc bug... this is either not defined, or Doc is wrong
// alert("The geocode for the given address or the route for the given directions query cannot be returned due to legal or contractual reasons.\n Error code: " + gdir.getStatus().code);

else if (gdir.getStatus().code == G_GEO_BAD_KEY)
alert("The given key is either invalid or does not match the domain for which it was given. \n Error code: " + gdir.getStatus().code);

else if (gdir.getStatus().code == G_GEO_BAD_REQUEST)
alert("A directions request could not be successfully parsed.\n Error code: " + gdir.getStatus().code);

else alert("An unknown error occurred.");

}

function onGDirectionsLoad(){
// Use this function to access information about the latest load()
// results.

// e.g.
// document.getElementById("getStatus").innerHTML = gdir.getStatus().code;
// and yada yada yada...
}
</script>

</head>
<body onload="initialize()" onunload="GUnload()">
<div style="background-color: #CCCCCC">
<form action="#" onsubmit="setDirections(this.from.value, this.to.value, this.locale.value); return false">
<table>
<tr>
<th align="right">
From:&nbsp;</th>
<td>
<input type="text" size="25" id="fromAddress" name="from" value="" /></td>
<th align="right">
&nbsp;&nbsp;To:&nbsp;</th>
<td align="right">
<input type="text" size="25" id="toAddress" name="to" value="" /></td>
<th align="right">
Language:&nbsp;</th>
<th align="right">
<select id="locale" name="locale">
<option value="en" selected="selected">English</option>
<option value="fr">French</option>
<option value="de">German</option>
<option value="ja">Japanese</option>
<option value="es">Spanish</option>
</select>
</th>
<td>
<input name="submit" type="submit" value="Get Directions!" class="button" /></td>
</tr>
</table>
</form>
</div>
<div style="border-width: 1px; border-color: #000000; border-style: solid;">
<div style="overflow: auto; width: 99.5%; height: 380px">
<table class="directions" style="width: 100%; height: 100%">
<tr>
<td valign="top" style="width: 275px;">
<div id="directions" style="width: 275px; background-color: #ffffff;">
</div>
</td>
<td valign="top">
<div id="map_canvas" style="width: 100%; height: 375px; background-color: #ffffff;">
</div>
</td>
</tr>
</table>
</div>
</div>
</body>
</html>

If you would like to know how you can add your VF page which contains the S-Control to your Account's page click here.

Bring Graphical Charts into your CRM Easily

There is no doubt that nothing communicates better and faster than graphics with users. It has been always the case that users fail to utilize software solutions merely because the information is not delivered to them intuitively, comprehensively and graphically.

Managers often require summarized business critical information quick and easy to grasp. Utilizing charts in Web Applications has been a challenge for many of us over the past two decade and now it is all much easier than ever!

Google Chart is an excellent tool available for free! It is actually very easy to work with and practical.

In this article I will demonstrate how you can utilize this outstanding component to bring new life to your Salesforce pages!

Example: I have a requirement to create a Visualforce page to view a pie chart that shows number of Accounts in our organization divided by their Types.


Here is how it works:
The Google Chart API requires me to pass the chart information via URL parameters and then in return Google will send me an image in PNG format. Then all I need to do is to view the image using the HTML img tag!

Ingredients:
Chart Server URL: http://chart.apis.google.com/chart
Parameters List:
  • chs: is in fact the chart size in pixels ex: 300x200
  • chd: you will need to pass the chart data using this parameter. ex: t:60,40
  • cht: chart type, ex: p3
  • chl: chart items' label, ex: Data 1|Data 2
The above are all basic required parameters in order to create charts. So there is more to it if you are interested.

So in order to utilize this component I create a Visualforce page as follows:


<apex:page controller="googleChartCon" tabStyle="Account">
<apex:sectionHeader title="Accounts by Type"></apex:sectionHeader>
<apex:image url="{!chartData}"></apex:image>
</apex:page>

This page only contains an apex:image component which talks to the controller to obtain it's image URL.

The URL is where the magic happens so we will need to focus on that.

In order to do this I first need to get a list of Account's "Type" picklist values and then
in my custom controller, I create an internal Apex class to save the chart's data while I am running through Account's records and find out how many of which type we have in our database.


public class googleChartCon {
private String chartData;

public String getChartData()inter
{
 return chartData;
}

public googleChartCon()
{
 //obtain a list of picklist values
 Schema.DescribeFieldResult F = Account.Type.getDescribe();
 List<Schema.PicklistEntry> P = F.getPicklistValues();
 //where chart data should be stored.
 List<ChartDataItem> items = new List<ChartDataItem>();

 //iterate through each picklist value and get number of accounts
 // I wish we could do GROUP BY in SOQL!
 for(Schema.PicklistEntry pValue : P)
 {
    integer Count = [select count() from Account where Type = :pValue.getValue() limit 10000];
    if (Count > 0)
      items.add(new ChartDataItem(pValue.getValue()+ '-['+ Count.format() + ']' , Count.format()));
 }

 //Prepare the chart URL
 String chartPath = 'http://chart.apis.google.com/chart?chs=600x200&cht=p3';
 chartData = chartPath +  getChartData(items);
}

private String getChartData(List<ChartDataItem> items)
{
 String chd = ''; //23,34,56
 String chl = ''; //Hello|World

 for(ChartDataItem citem : items)
 {
    chd += citem.ItemValue + ',';
    chl += citem.Label + '|';
 }
 //remove the last comma or pipe
 chd = chd.substring(0, chd.length() -1);
 chl = chl.substring(0, chl.length() -1);

 String result = '&chd=t:' + chd + '&chl=' + chl;
 return result;
}

public class ChartDataItem
{
 public String ItemValue
 {
  get;
  set;
 }

 public String Label
 {
   get;
   set;
 }

 public ChartDataItem(String Label, String Value)
 {
    this.Label = Label;
    this.ItemValue = Value;
 }


}

}
For some security might be a concern sending the data via URL parameters.
Up to this point, I have not been able to confirm if Google is officially supporting SSL connections to rectify this problem. However the following seems to be fine:

https://www.google.com/chart?cht=p3&chd=t:60,40&chs=250x100&chl=Hello|World


In this article I have barely scratched the surface of Google Charts API, if you are interested to learn more about it go to http://code.google.com/apis/chart/

Mass Updating Standard Object Records Without a Save Button!

Today we want to explore one of the beauties of the Visualforce technology.
Those who have a history of witting ASP or ASP.NET code will admit that Visualforce has made it all too simple to develop business applications.

Let's say we want to be able to update several records of a certain Object all together providing ability for users to quickly make modifications and save them.

This is particularly useful when the data in nature changes often and it's time consuming to do the updates on a record by record basis.

In this example, I will demonstrate a Visualforce page which has a search box through which user can search Accounts and view a list of records where he or she can modify the information inline and then proceed to the next record without clicking on a save button of some sort!

This is very much as easy of entering data into cells of an excel sheet! The only difference is that the Excel needs you to click on the save button at the end but our Visualforce page won't!

I will use an actionFunction tag to create a javascript function which in turn will trigger a method of my Apex controller class. This way when the value of one the input controls changed I can call that javascript function and boom the change would get posted back to the controller and will be saved.

This the how Visualforce page is like:

<apex:page tabStyle="Account" controller="massAccountUpdateCon">
<apex:sectionHeader title="Accounts Mass Update"></apex:sectionHeader>
<apex:form >
<apex:pageBlock title="" id="pageBlock">
  <!-- This block will show the search textbox and the Search button -->
  <apex:pageBlockButtons location="top">
    <apex:inputText value="{!keywords}" style="height:15px;"></apex:inputText>
    <apex:commandButton value="Search" action="{!ViewData}" id="theButton" rerender="pageBlock" status="status"></apex:commandButton>
  </apex:pageBlockButtons>
  <!-- To show page level messages -->
  <apex:pageMessages ></apex:pageMessages>

  <!-- The below tag will provide a javascript method which when is called in turn will call a controller's method -->
  <apex:actionFunction action="{!UpdateRecords}" name="updateRecords" rerender="pageBlock" status="status"></apex:actionFunction>

  <!-- This table contains columns which have inputfield components -->
  <apex:pageBlockTable value="{!accounts}" var="a" rendered="{!NOT(ISNULL(accounts))}">
     <apex:column>
       <apex:facet name="header">Name</apex:facet>
       <apex:inputField value="{!a.Name}" onchange="updateRecords();"></apex:inputField>
     </apex:column>
     <apex:column >
       <apex:facet name="header">Phone</apex:facet>
       <apex:inputField value="{!a.Phone}" onchange="updateRecords();"></apex:inputField>
     </apex:column>
     <apex:column>
       <apex:facet name="header">Billing City</apex:facet>
       <apex:inputField value="{!a.BillingCity}" onchange="updateRecords();"></apex:inputField>
     </apex:column>
     <apex:column>
       <apex:facet name="header">Billing Country</apex:facet>
       <apex:inputField value="{!a.BillingCountry}" onchange="updateRecords();"></apex:inputField>
     </apex:column>
     <apex:column>
       <apex:facet name="header">Industry</apex:facet>
       <apex:inputField value="{!a.Industry}" onchange="updateRecords();"></apex:inputField>
     </apex:column>
  </apex:pageBlockTable>

</apex:pageBlock>

<!-- The action status to show when the AJAX postback is wroking. -->
<apex:actionStatus id="status" startText="Requesting..."/>
</apex:form>
</apex:page>


Now the Controller, this is where the simplicity of coding can be visibly seen!
As you can see in the Controller's source code, I do not need to write any code to find which column's value was changed! All I need to do is to update my List of Accounts!
Visualforce will take care of all those details!


public class massAccountUpdateCon {

  private List<Account> accounts;

  public List<Account> getAccounts() {
      return accounts;
  }

  public string keywords {
    get;
    set;
  }

  public PageReference ViewData() {
     //dynamically build the query to insertthe filter values
     String query = 'Select id, name, type, ownership, industry, phone, BillingCity, billingCountry FROM account WHERE name LIKE \'' + keywords + '%\'';
   
     accounts = Database.query(query);
                   
     return null;
  }

  public PageReference UpdateRecords() {
    // this simple line of code finds out which column was changed and update the 
    // relevant account record accordingly!
    update accounts;
    return null;
  }
}


Adv:


<a href="http://www.PaisaLive.com/register.asp?3253158-6210830"><b><font color="#FF0000" size="4">!</font></b></a>